Showing posts with label Everyday Decor. Show all posts

Thursday, April 4, 2013

Twine Wiffle Balls

Hi Everyone!! Shortly after starting this blog my sister and I both have moved, several times, and we have had 3 babies between the 2 of us! That's right...3!! (2 of them are mine and were born only 11 months apart....can we say SURPRISE!!!) Anyways, between all of that we kind of let the blog go to the wayside, but now I think that we are both to a point where we are ready to start crafting and repurposing and decorating everything we can get our hands on!
So without further adieu....a new tutorial!!
I was at the dollar store the other day and saw a 4 pack of wiffle balls and thought "I should be able to figure something out with these!" I had just ordered some twine off of Amazon (my hubby needed a cheap filler and I have been wanting, needed some twine) and was dying to use it. So away I went. I decided to cover the balls with the twine! Can we say Cheap! I made about 10 balls and it only cost me about $4 total! Woohoo! 
 Here is the starting of the first ball. I found that it was easiest if you started on a bigger section with no holes. When you decide where you are going to start make sure and take a look at the other side to be sure that you won't end on a hole! I may be speaking from experience :)   Put a dab of hot glue on the ball and press your twine into it. This is your starting point. From here you will just wrap the twine around in a circular motion.
 Here is the ball about half way done.
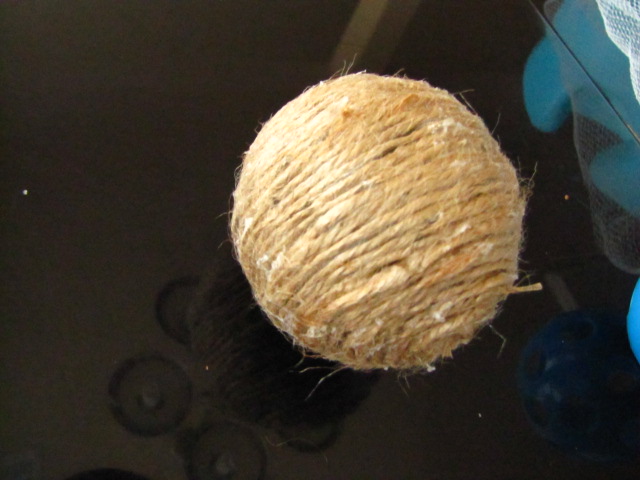
 Top view!
 And done! Each ball only took about 20 minutes.
 A little comparing to see what we started with!
Tada! The finished product! I plan on spray painting mine to match the rest of the decor in my house...but that is another project!

Photobucket

Monday, March 29, 2010

Been a While....

Been missing- sorry! Life catches up to you hard core sometimes and that's just how it is. BUT, I did this projects this morning that I LOVE.
I was lucky enough to attend a scrapbook convention over the weekend and a company was clearancing out a lot of vinyl product. So of course... I jumped on that boat! lol

I've had this mirror for a long time. 2 years ago I painted the frame black and just today- added my clock.

It's a vinyl clock kit. Comes with everything to need to make this clock. I had wall space, but my walls are bumpy, so vinyl doesn't like to stick to it all that well. I thought it might be different and fun to put my clock directly on my mirror.
Now here are the before and after pics- totally easy and it the whole thing cost me about 30 minutes and $15. Cute right?!

Toodles!


Photobucket

Wednesday, December 9, 2009

Toy Shelf

Ok... I have been working on this project for a while now and I finally was able to get it finished. I am SOOOOOO excited. It turned out so great and works great. So, here is what I did...
Turned a bookshelf into a toy shelf. Doesn't sound to genious when I type it out, but here is how I did it.
1. Took an old bookshelf that looks like this: I took all of the shelves out and the backing off (you could leave the backing on if you want, I took mine off because I want to be able to access it from both sides.) 2. Turned it sideways like this: At this point, I went to Home Depot and bought a peice of wood that measures 10 inches wide by 6 feet long. (I bought this size because it was the perfect sixe and there was no cutting involved) Then I screwed it in about half way down the shelf.3.I built me an insert out of the old shelves. (I did this because I wanted more storage space for my smaller baskets, you don't have to do this part) Here is what it looks like with both additions.
4. I painted it of coarse!! What color??? Orange!! And it looks soooo cute!! It will look even better when I move it into the room it is really going to go in against the green walls.Tada!! Enjoy and let me know if you have a cool project like this too or if you try this one out!!
Photobucket

Friday, November 20, 2009

Corner Shelf Redo

I am soooooo excited!!!! I found this beauty at a garage sale and only paid $10 for it!!!!! Talk about awesome!!!

It came with this color, so, I painted it!!! :) Sorry I forgot to take a before pic, but here are the after pics.
After I painted it, I scuffed it up a bit using sand paper. I love, love, love how it turned out. It has totally changed the entire look of my dining room!!! So, next time you are out driving around and see a garage sale, stop!!! Because you never know what treasure you might find!!!!

Becky

Thursday, November 19, 2009

Coolness

I found some things that are just plain cool. I love how "out of th box" people can be in their expressions via home decor. Someday.... my house will be this cool. lol


Photobucket

Friday, November 13, 2009

Create Wall

So, I did this one a while back, but it is still my favorite wall in the whole house. I made the CREATE out of vinyl and then just hung a really thick piece of wire on 2 nails (one at each end). I use safety pins to attach the pictures, although I think that using those really small clothespins would be a lot more cute, I was going for cheap, so I used what I had on hand. It works and my daughter loves to put the things that she makes on the wall.

Photobucket src="http://i182.photobucket.com/albums/x300/scrapperamber/siggy2.png" border=0>
Posted by Picasa

Thursday, October 15, 2009

Nursery/Kid Room

I found this the other day... it makes me happy :)
I do believe this will be the EXACT thing I do to my boy's room. The color combo is just perfect and you can't walk into a room like that and NOT like it. *sigh* I'm in love. lol


Photobucket

Monday, October 12, 2009

DIY Lampshade

I know that there are a lot of lampshades out there. Most of the time, if I'm going to have a lamp in my house, I'm going to want a funky, fun design on the lampshade instead of the typical plain colored one.


I found this tutorial on another site called J Caroline Home. It's full of projects and inspiration.


So enjoy this small tutorial... it's uber easy. I'm going out to find me some cheap fabric and re-do the lamps that I already have :)


*You can buy pre-glued lampshades or cover a plain one. With the self-adhesive variety, the
lampshade's label is the pattern for your fabric. If you fabric edges won't be covered with trim,
add a 1/2" seam allowance and fold it over the lampshade and glue to the inside.
*If you want to cover a lampshade you already have, make a pattern from a piece of newspaper.
Tape or use temporary spray adhesive to stick the paper to the lampshade and use a
highlighter to trace around the edge. Overlap where your edges meet by approximately 3/4".
Then remove the paper and cut to make a pattern. Cut your fabric based on your newpaper
pattern. You can then use a permanent spray adhesive to adhere the fabric to the lampshade. I
recommend spraying the lampshade thoroughly and then applying the fabric.
*Where the fabric edges meet, fold the raw edge of the top fabric under and use Tacky Glue to
glue down. Then you can use glue on the edges to prevent the fabric from pulling up.
*On the lampshade shown, I used a bias tape (basically a narrow piece of fabric similar to a
ribbon with the raw edges folded in to the middle) as the trim, which I glued on the top and
bottom with Tacky Glue.

Photobucket

Wednesday, October 7, 2009

A Few favorite things

I found these yesterday and I'm in love. All 3 of these places are something that I need to add to my "dream house" folder. I'm in love with that wood walkway though.... what a way to make a statement, but also keep things natural and green. And I might want to attempt to do that mirror mural above my fireplace... it's so pretty :)


Photobucket

Monday, October 5, 2009

Inspiration Boards

I found this blog and I LOVE it. Seriously- Jenny is so crafty and cute. Her blog is Little Green Notebook. I saw this on her blog and thought it was so adorable and so easy- I plan on doing it for the board I'm putting in the basement for the kids. This is easy DIY and very budget friendly. This come directly from her blog:

"I picked up a pair of very cheap cork boards and painted the frames with that same yellow paint that I used in my girls room (Martha Stewart "Olive Oil"). No need to tape or to be careful with the paint job here since the cork will be covered up.


I measured and cut up some old fabric that I bought for a project and never used (--Are you picking up on a theme here??) and simply ran a line of fabric glue around the border of the cork board. I glued one edge at a time and smoothed like crazy so that the fabric would lay perfectly flat. (PS the fabric is an outdoor print made by Waverly, called "Lovely Lattice" in Lagoon)


Then I fabric glued on some red gimp/trim to cover any imperfections or gaps in the border.


I hung up the refinished cork boards about five minutes before taking pictures, so I haven't had a chance to really style them yet with inspiration stuff, but that can be a fun ongoing project."


Since then... she's finished her room and it's adorable. Check out this sample of what this portion of the room looks like. Totally cute right?
Be sure to check out her blog for even more adorable and EASY projects! Thanks Jenny for the inspiration!
Photobucket